This is my first real CNC project, a cyclone dust separator.

There are lots of different versions of these floating around, but most use big box store five-gallon buckets, or larger garbage cans, but I wanted one that would fit comfortably underneath my CNC table and still have some capacity.

I settled on using a short, 10 gallon steel bucket

The lid and is made of 1” plywood, cut with a 1/4” endmill and a 90 degree chamfer bit. The baffle just redirects airflow, so only uses 1/2” plywood. It was also cut with a 1/4” endmill, but the extended section that contacts the wall of the bucket was tapered with a 1/4” ball end mill to match the slope of the bucket.

Lid after cutting on the CNC
Baffle profile cut
Baffle profile cut
After trimming off tabs on the router table

I’m using readily available schedule 40, 2” PVC pipes and fittings and 3d-printed this fitting to allow the pipe to pass through the lid at a 45° angle.

3D printed fitting
3D printed fitting

I installed the fitting using wood screws and caulk to seal it, and added a bead of caulk in the lip and smoothed it down. It kind of works, but a softer silicone caulk would have worked better.

3D printed fitting
3D printed fitting

I held the lid and baffle together with dowels, screwed in from the top and bottom. Here’s the assembled lid with baffle (upside down).

Lid assembled
Lid assembled
Fully assembled separator

To connect the separator to my shopvac and hoses, I used 2” PVC, heated (agonizingly slowly) with a (tiny) heatgun until they could be formed over my hose fittings.

PVC vacuum hose adapter

It works well, but I haven’t measured its efficiency. I’m not really seeing anything in the shopvac now though.

Success
Success

CNC tool setter

I had some keyboard switches left over from a previous project, and wanted a more convenient process for changing bits during a job.

Bit setter mountet to wasteboard

This is a simple switch, wired in parallel with my touch plate, that is used before and after changing router bits.

When changing a bit, a macro offsets the Z height by the difference between the first and second tool length, and work can continue with the new bit.

This process is much faster than manual zeroing after changing bits, or using the touch plate. The tool can overshoot the switch’s trigger position slightly without damage, so the probe speed can be much faster than a touch plate, and it doesn’t require connecting the probe clip.

Additionally, if the original zero position has been carved away by the previous job, the tool setter can still be used.

It’s promising, but has some issues.

First, it has moving parts exposed to cnc dust and chips. I added a magnetic cover for it to help with that

Second, though it’s much lower profile than commercial options, it’s just about flush with the surface of my wasteboard. For surfacing, when I’m cutting off the edge, I’ve been pulling the cap off and taping it down. I’m planning to move it out in front of the wasteboard instead.

Third, repeatability isn’t amazing (around 0.02-0.04mm) because the 3d-printed button top I’m using isn’t a perfect fit on the switch, and the switch has some play as well. I’m looking to replace it with something with less play, but haven’t found the right thing yet.

3D printable files for it can be found here


CNC software and jogging

To drive the CNC, I’m currently using CNCjs, installed on a Raspberry Pi 3b+.

The system is currently headless, because I don’t have a dedicated laptop for it, and my CNC lives in my garage where it’s too cold to leave an LCD screen.

CNCjs is fine, and a good fit for this use case, but pretty clunky on a small screen, and lacks some of the features available in other gcode senders, like autoleveling, basic gcode generation for simple operations like facing, cancelable jogging, angle deviation probing…

I find jogging via the default web interface really uncomfortable. It’s very easy to hit the wrong button among the tightly packed buttons, and do something bad, like rapid moving to zero when things are in the way. I’d like to say I only did this once, but…

The other issue with jogging like this, particularly with a small screen is that button presses may be queued, and delayed, and then may execute in series unexpectedly. There’s also no real way to quickly cancel dangerous moves.

I saved myself some pain by enabling soft limits in GRBL, but I need to tune these better.

For small screen use, there’s a much better interface at https://github.com/cncjs/cncjs-shopfloor-tablet, which I used for a little bit. It too has some issues; It’s much better suited to a tablet display than a phone, and you cannot run macros from it.

I started down the path of making the interface more responsive, but stopped using it before finishing.

I also ran into this issue which drove me crazy for a few days before discovering that, if I left the interface open on my phone, and the phone went to sleep, whatever job was running would halt.

File uploading

To transfer gcode from my machine to the raspberry pi, I’m currently using https://github.com/efeiefei/node-file-manager to upload the gcode to the CNCjs watch folder. It would have been easy to set up network shares for this also.

I’ve also written (hacked together) a utility to upload gcode files to node file manager, as well as opening them in my default editor, and have set this utility as my Fusion 360 editor.

Now, these are automatically uploaded after post processing.

Utility can be found here: https://github.com/Billiam/upload-passthrough

Probing and other macros

I’m using a few macros right now.

One for XYZ probing using a touchplate, as well as two for a bitsetter are from here: https://github.com/cncjs/CNCjs-Macros

I duplicated the XYZ probe one and deleted a bunch of it to act as a Z-only probe, since I’ve been setting the Z-zero to my spoilboard away from my material, when I do full through cuts.

I’m also using one from this page to jog around the X/Y perimeter of loaded gcode: https://github.com/cncjs/cncjs/wiki/User-Guide

Jogging improvements

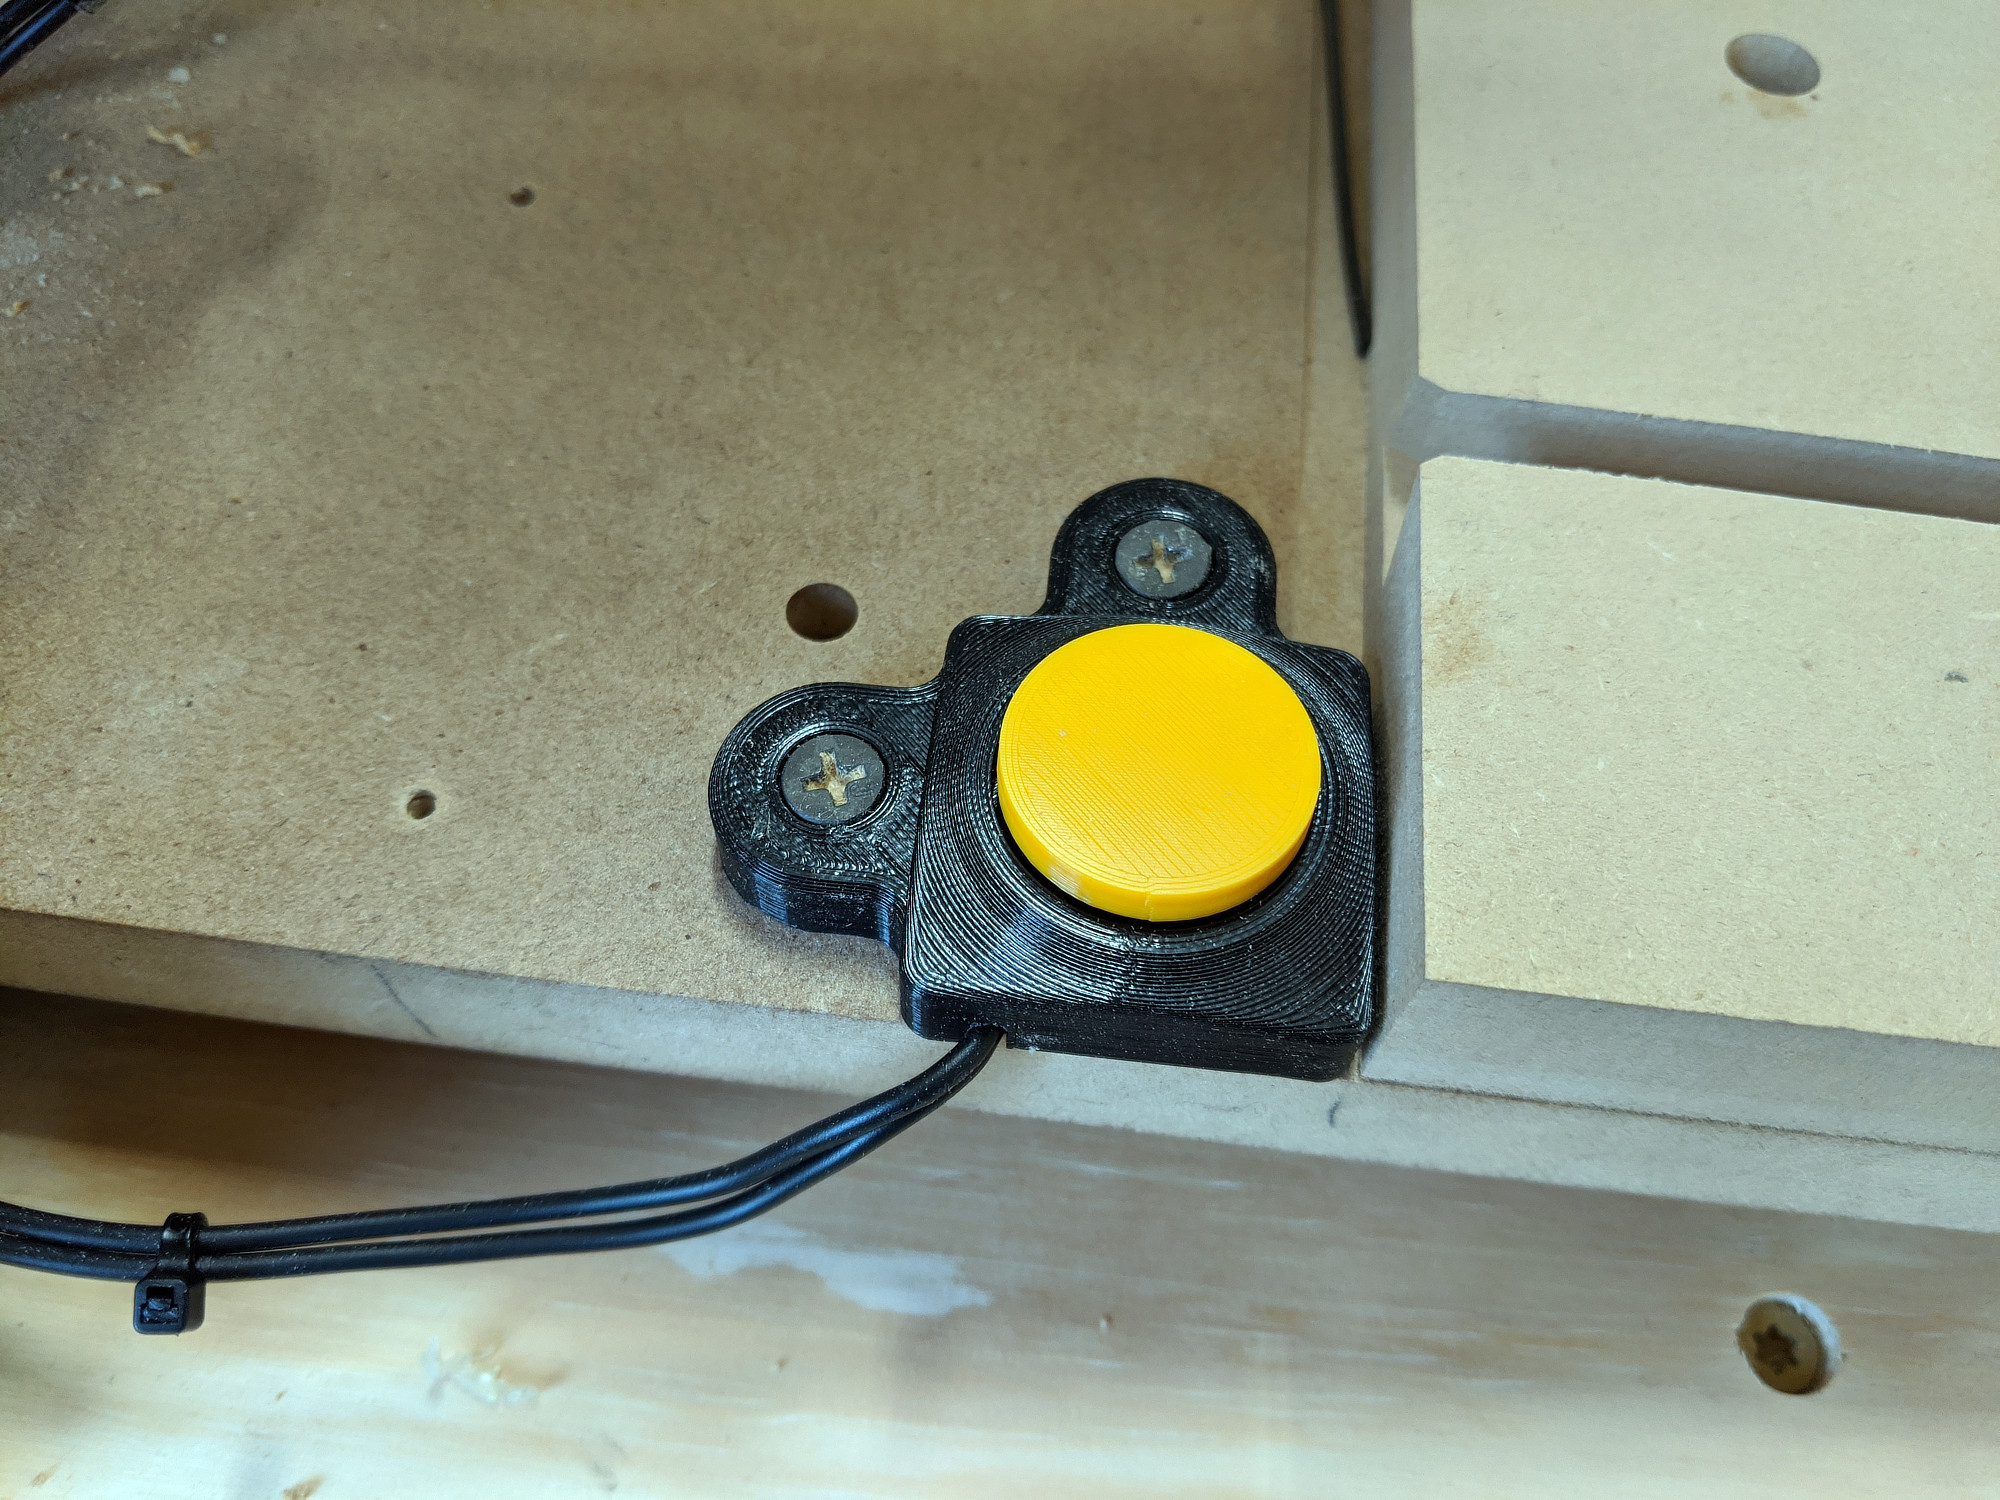
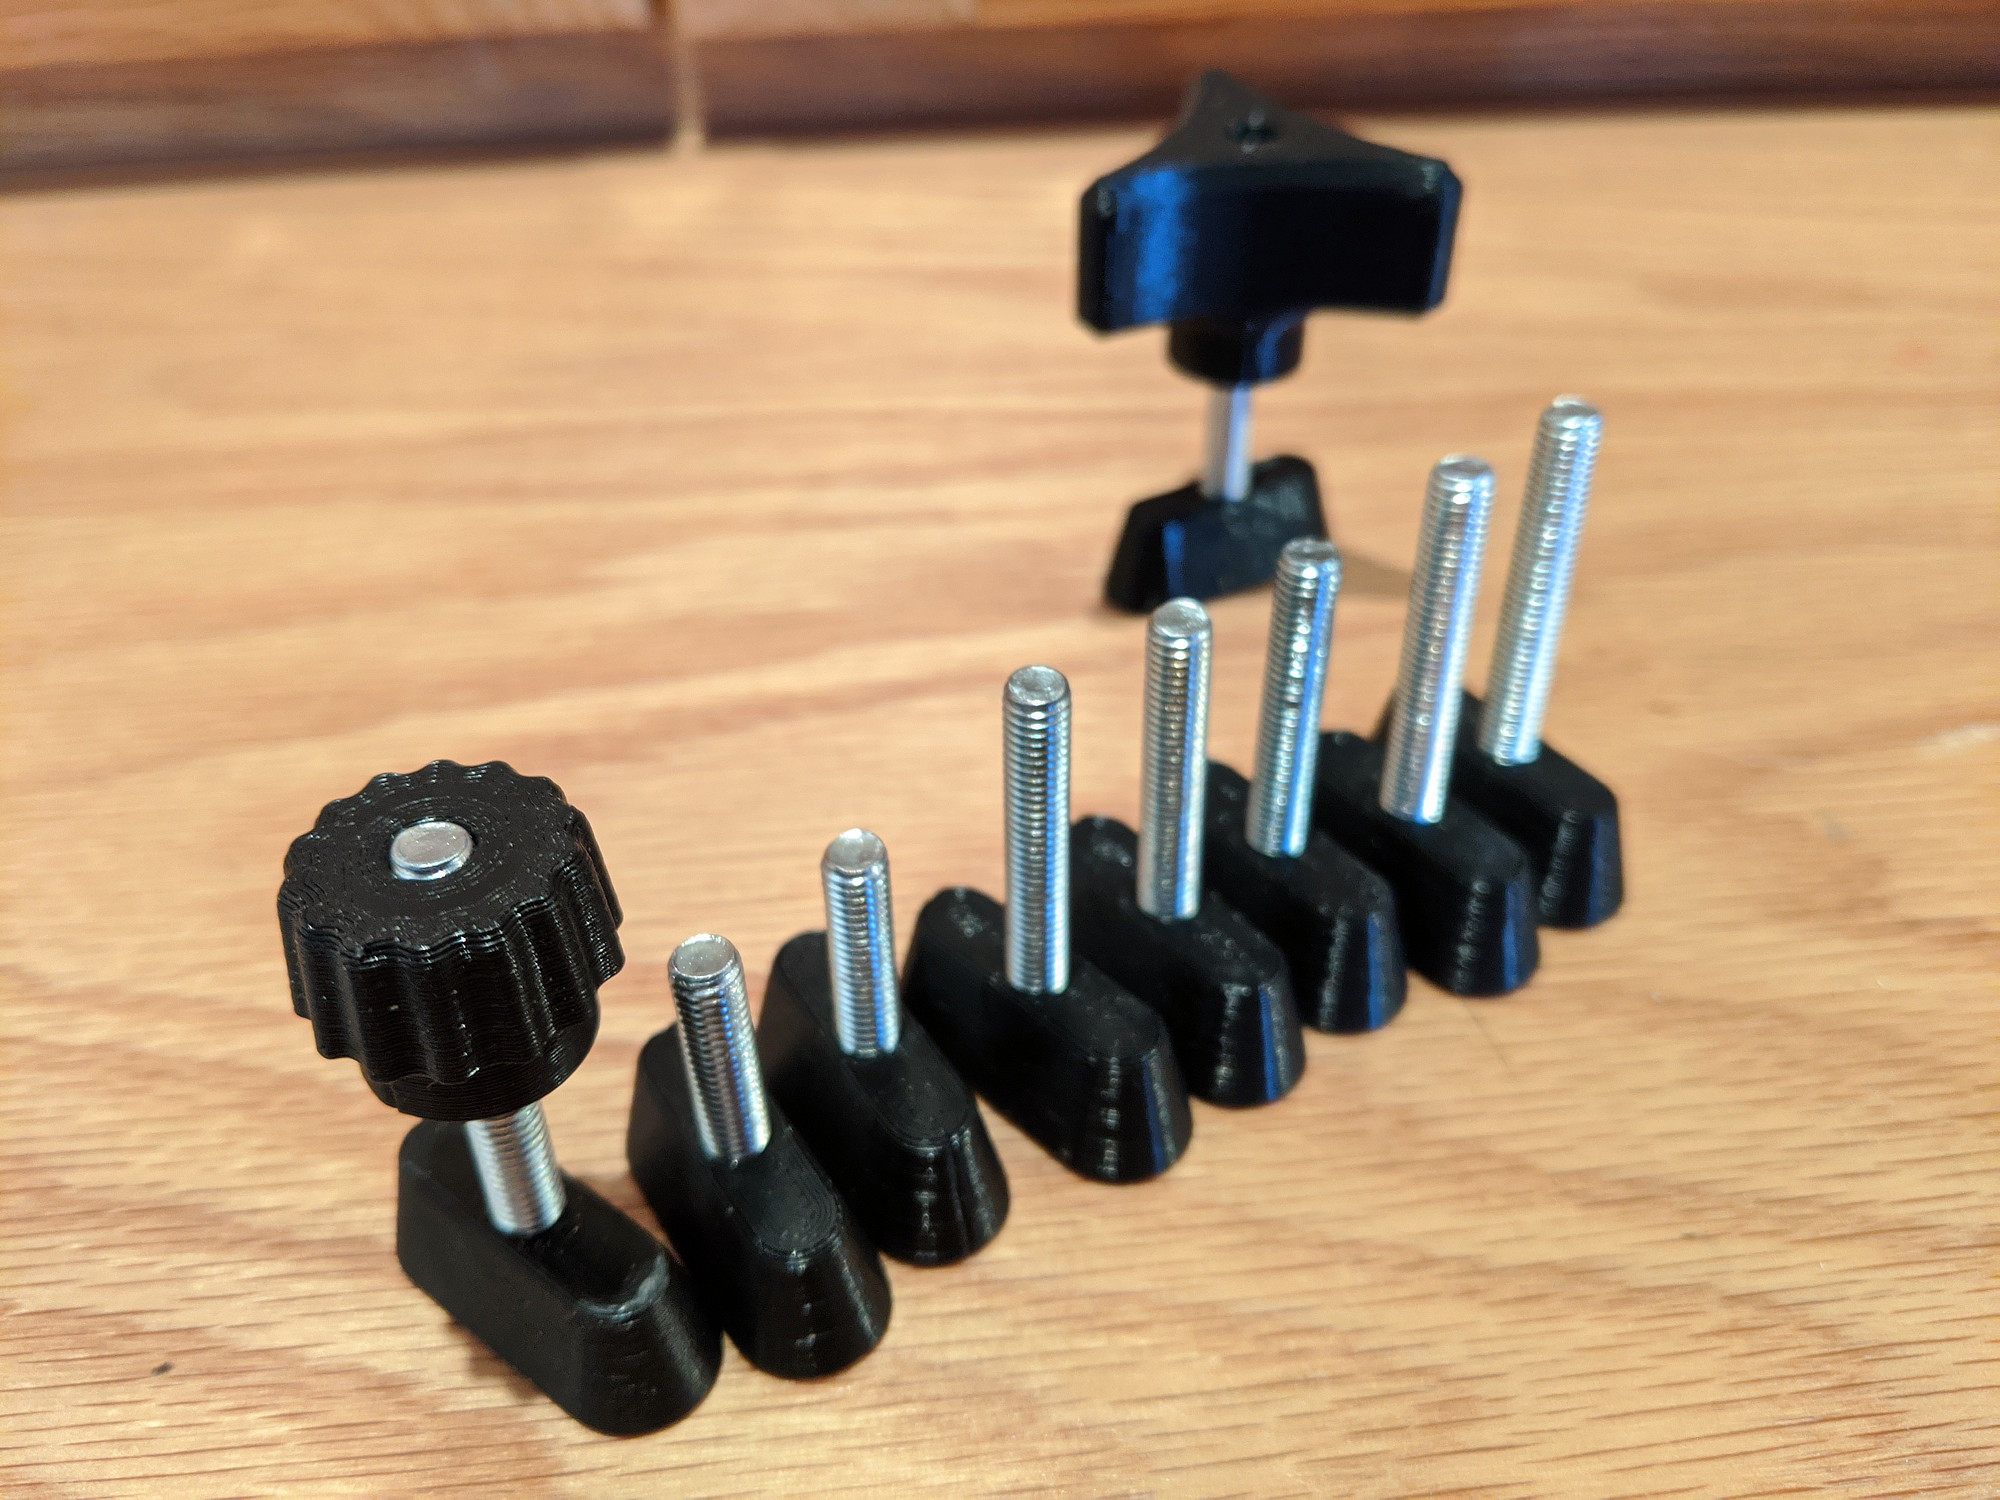
I dug up a wireless keyboard I’d forgotten about, the Logitech K400+.

I found this module for CNCjs which allows jogging with a wireless keyboard: https://github.com/cncjs/cncjs-pendant-keyboard, but I don’t have that specific one, and some of its special key mapping didn’t translate to mine.

I also found this one which supports smooth jogging while holding a key, as well as grbl jog cancelling. https://github.com/jheyman/shapeoko/tree/master/cncjs-pendant-keyboardreader

This one is more generic, but can’t work with my headless setup, as it requires the running application to maintain focus.

I’ve forked it here: https://github.com/Billiam/cncjs-pendant-keyboardreader

It now uses node-hid like cncjs-pendant-keyboard so it doesn’t require focus, and works with the Logitech K400 plus.

I have it set up to jog on X and Y with the arrow keys, Z axis via I and K in 0.1mm increments.

Ctrl + direction will move 10mm at a time.
Alt + direction will move 1mm at a time.
Shift + direction will move continuously in that direction until shift is released.

Ctrl + H will home the machine.

I’ve also added a few macros via keyboard:

Ctrl + P will run an XYZ probe
Ctrl + Z will just run a Z probe
Ctrl + 1 will initialize the bitsetter for the first tool
Ctrl + 2 will use the bitsetter for tool changes
Ctrl + Shift + Return will continue after pausing for toolchanges.

With an easier setup for jogging, I’m only using the default CNCjs interface on my phone to start jobs.

Eventually, I’d like to replace the keyboard with something more specialized, but most of the commercial ones I’ve seen aren’t compatible with GRBL.


CNC workholding

After finishing the dovetail grooves, I started on workholding and clamps by designing and 3d printing some dovetail inserts and knobs.

Dovetail fittings and knobs

Dovetail inserts and knobs

I tried a few different bolts, but settled on 40 and 50mm M5 hex bolts. Any longer, and I have trouble clearing them with my router (and extra spoilboard).

For clamping taller blocks, I can counterbore them to recess the clamping knobs into the material a bit, and this helps keep the clearance height down a bit.

Clamping block with counterbored hole
Knob recessed into block surface

The inserts and knobs went through a few iterations.

The inserts got a little smaller in width, so that they can slide in the dovetail grooves more easily, and a deliberately undersized nut diameter so that the bolt heads fit tightly in them, instead of being easily pressed in.

Most recently, I also made them a little bit shorter, so that I can surface the spoilboard a few times, but also to make sure that when clamping they don’t press directly against whatever it is I’m clamping, causing them to slide even when clamped tightly.

These are not perfect though. With tight clamping, these get stuck in the MDF. I’m not sure if the MDF is getting deformed and snapping back when pressure is removed, or if the layer lines in the 3d print are kind of biting into the MDF surface, or if they’re getting jammed by rotation.

After clamping tightly, I usually have to uncscrew the knobs, pull off the blocks or cam clamps, and then poke the inserts back into the slots with a screwdriver to free them up. I’m not sure how to solve this yet. I’ve tried a few variations so far.

  • Sanding and polishing the inserts so that layer lines are soft and smooth
  • Increasing the taper of the inserts, so that they’re tighter toward the bottom of the slots
  • Rounding the top of the inserts so that the edges are less likely to gouge in
  • Adding reliefs in the sides at 10 and 4 o’clock, so that they’re less likely to get jammed by rotation.

I haven’t notice any difference with these though.

Stop blocks

I started by just drilling 5mm holes in random bits of scrap wood. This works fine with enough lateral and downward pressure but quickly realized they work much better if they’re a little taller than the material being clamped, and also have a slight 15° bevel on them to help keep the material down. Seems obvious in retrospect.

These I just cut on a table saw, and then drilled a hole roughly in the center.

Cam clamps

These are simple spiral-shaped cam clamps that apply sideways pressure, but won’t hold anything down.

I cut these from 3/4” plywood, and they work great.

Clamps all cut out and drilled

Round cam

The above picture also has my first pass at a round cam clamp, cut from scrap redwood. This one is one inch thick and has the same 15° bevel on it to help hold work down. Before cutting it, I drilled two holes through it surface and held it in place with flange nuts rather than clamping.

This was roughed with a 1/4” square endmill, and then finished with fine passes with a 1/4” ball endmill. This could have been made much easier and faster without the CNC, using a bandsaw and an a tall bevel bit, but I don’t have either.

Here’s what it looks like in use.

Spiral cam holding a block

I refined the shape a bit, so that it has a smooth spiral from beginning to end, instead of having some lost space around the perimeter that can’t be used for clamping, and cut a new one from 1” plywood (really two 1/2” sheets sandwiched together).

Instead of bolting through it, I modeled tabs for it manually in Fusion.

Round cam after routing
After removing from the sheet

Low profile clamp

One issue I’m having with these styles of clamp is that they have to be taller than whatever I’m working on to have any holding power (at least downwards).

I’m experimenting with low profile sliding clamps, and just finished designing and assembling this one (a rebuild of one I found on thingiverse to fit my hardware).

Low profile clamp, printed
Clamp in use
Clamp in use

This uses a M5 18mm socket screw (I’m really using a 16mm but it’s a little short) for the sliding part, a M5 16mm screw to hold it to the dovetail insert, and a couple of 5x25mm steel dowel pins.

It holds fairly well, but I haven’t tested it thoroughly yet. It may not be better than any other side clamp, especially since the “teeth” are quite dull.

Files and downloads:


Spring cleaning

Some minor site updates (once every 5 years, whether its needed or not, imo).

Added pagination, because all of the posts on a single page used something like 84mb in images.

Added a projects section to track larger/longer term projects chronologically.